
HOME AND GARDEN
How to Plant a Garden

|
Things To Do To Complete Your Garden Consider these points in selecting your plot:
Note: Check the plot after a rain to note the low areas, which should be drained or filled in. The soil in a low area may show poor production. In some instances you may use an area too wet for the spring garden or a fall garden. The Garden PlanMake a garden plan and make the plan work. A good plan is a "must" for the beginner gardener. Your plan will include what vegetables to plant, which varieties to select, and their locations in the garden. Unfortunately, critters (and children) may take a shine to your new garden. Rabbits, geese and deer can be a problem. For the small garden, a wire mesh surround works well. This will discourage most critters and some people. I've seen people take chicken wire and staple it to the top of their landscaping timbers on a raised bed to keep out geese and the like. Vandals can also attack gardens, especially in conspicuous areas of a city, such as in a community garden. Garden PracticesEvery gardener wants to grow as many quality vegetables as possible with the least expense. To do this you must use good garden practices.
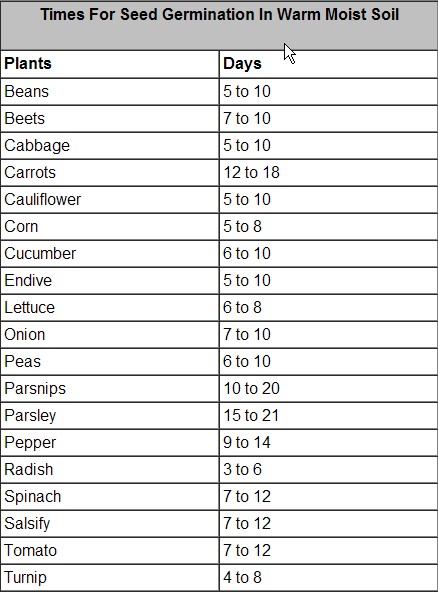
Don't concern yourself too much with the degree of acidity and alkalinity, or pH of your soil. Most common garden plants grow best when the soil is just slightly acid. If your soil is too alkaline or acidic, you can use various materials to neutralize or acidify it. Consult a local nursery to see if there are any problems in your area's soil and follow their advice. Packet backs will note if there are particular plants that have specific needs. Adding compost to any soil will also improve its chemical and mineral balance. If your soil seems rock hard with clay or very compacted, an excellent alternative is to build raised beds or big bottomless boxes bordered with wood, cinder blocks, railroad ties, or other materials. This way you can bring in some good soil to give you excellent results in a small space. Concentrate on adding a lot of decomposed organic material to your raised beds, even purchasing some bags of planting mix to fill them, so you can plant right away and have good crops the first season. Then you can work on improving a larger area for your garden over time. If gophers or moles are a problem in your area, the raised beds can be underwired with galvanized 1/2 inch chicken wire or hardware cloth. Just tack the sheets of wire to the bottom of the bed boards after excavating soil, then fill the frame back in. Another alternative if your soil is poor, or if you have limited sunny space, is to plant in containers. There are all kinds to choose from; plastic or clay pots or wooden planters in many shapes and sizes. In general get the biggest ones that are practical for you so your plants will have plenty of root room, and because larger pots dry out more slowly. For good sized plants like tomatoes or peppers or large flowers, depth should be 12 to 18 inches. Smaller plants like herbs, lettuce, and more compact flower varieties can grow in smaller pots. The most important things to remember when gardening in containers is that the soil mix must have a good loose texture that will hold moisture and won't pack down over time. You can buy many good brands of premixed planting mix from your local garden center to fill your containers. Don't use your garden or yard soil as it will get too compacted for good root growth and the moisture won't wet it evenly. Remember that you will be supplying all the food and water to plants in containers since their roots aren't in the ground where they can reach for nutrients and water in a larger area. Good moisture retention is critical, as is good drainage, so plan to fertilize and water all container plants very regularly. Making The Garden BedOnce you've decided on the size and location of your new garden, early spring weather has arrived, and the soil is ready to work, the first outdoor task is to prepare the garden soil. Mark out the garden area and using a digging fork, garden spade, shovel, or a rototiller, (convenient and fast, but not critically necessary), loosen the soil to a depth of 12 to 18 inches. If you live in an area where your soil is very dry, water first to make it easier to work, but make sure you don't ever dig when the soil is too muddy. Turn over the soil 7 to 10 inches deep and break up the clumps, removing rocks, branches and weeds. Mark out paths so you can make "beds" where plants are to grow. As noted above, two to three foot wide beds make ample planting areas and they are not too wide to reach across from both sides to weed, water or harvest. Once you have worked up your soil, walk only on your paths so you don't compact the soil and lose the nice fluffy quality you are working to create in the planting areas.FertilizingMost vegetables are heavy feeders and require a soil well supplied with plant food and organic matter. Do not attempt gardening without using fertilizer. Do not use fresh manure during the growing season because it may burn young plants. Do not use freshleaves except as mulch. Compost also works well as a side dressing material. Now add a layer of 3 or 4 inches of well-rotted organic material to the beds and turn it in until it is as crumbly and even as possible. At the same time you can incorporate other fertilizers. Especially in new gardens, the organic material you've added won't supply enough nitrogen soon enough to feed your first plantings. Follow fertilizer package instructions and work in well to the top 4 to 6 inches of soil of the bed so it will be available to the shallow feeder roots of young seedlings. Finally, smooth the surface of the soil with a rake to make a fine-textured seed bed. The goal is to have finer soil on the top and coarser down below, providing for good water percolation and drainage. Although it may still be too chilly to plant your warm weather crops in early spring, go ahead and prepare the soil for them at the same time you are digging and fertilizing the other beds and getting ready to plant your cool season varieties. This will give you a head start and will also let some early weeds germinate which can be scraped off with the rake when you are ready to plant. This will result in less weeds to come up later with your summer sowings. The three nutrients used most by your plants are the so-called macronutrients, Nitrogen (N), Phosphorus (P), and Potassium (K). Nitrogen stimulates green leaf growth and form's proteins and chlorophyll. Phosphorus contributes to root, flower and fruit development, as well as disease resistance. Potassium promotes stem and root growth and the synthesis of proteins. Well-made compost will supply most of these needs. You can also add slow acting soil feeders such as bone meal and cottonseed or blood meal, or use commercial granulated fertilizers in preparing the soil for planting. Be sure to follow directions for amounts to add; more is not necessarily better. It will pay to use a balanced commercial fertilizer in the rows 10 days to 14 days before planting. This type of fertilizer (13-13-13 or 8-8-8) contains the three basic materials necessary for plant growth -- nitrogen, phosphorous, and potash. Use a balanced fertilizer such as 13-13-13 at the rate of 3 to 5 pounds per 100 feet of row. Spread it over the row and mix it 4 to 5 inches deep. The exact amount to use for each vegetable is determined by the kind of vegetable grown. Leafy vegetables usually require more fertilizer than pod vegetables. Preparing The RowsPreparation of the spring garden should start in the fall or winter before. The first step is to clean out the plot. Remove all grass, weeds, vines, and plant stubble. Spread the usual fall application of barnyard manure or compost over the plot and hoe under. How will you arrange the plants in your garden? For many vegetables, we recommend planting in wide rows or beds. Planting beds 3 feet wide are easy to reach into from either side. Make wide enough walking paths so you can move around the plants easily to water, weed and harvest. Some crops, like corn and potatoes are often planted in blocks. Plant corn in a block with at least 4 rows side by side rather than one long row because it is pollinated by the wind rather than by flying insects. When the tassel at the top of each plant is full of pollen, the wind must shake down showers of it to fall on the silks emerging from each tiny ear or you won't get well-filled out, plump ears. Sprawling plants like melons and squash are sown in well-enriched, slightly mounded planting circles called "hills" with about 4-6 feet of space between each hill for the vines to grow into. If you make the rows by midwinter, the winter weather will help in having a loose soil for early spring planting. When planting time comes in the early spring, all that will be necessary before planting is to "freshen up" the top of the rows for planting small seeds. If rows are too low after the winter rains, remake them and allow time to settle before planting. CultivationThe chief purpose of cultivation is to keep down weeds and grass. Cultivate shallow and as often as needed. There is no set time to do this job, but the best time is while the grass and weeds are small. SeedsSelect seed varieties that do well in your area and plant fresh seeds each year. Seeds more than one year old, bought or home-saved, should be tested before planting. If you're unsure of the quality of your seeds, do a germination test before using them. Place 10 to 20 seeds from a packet between moist pieces of paper towels inside a plastic bag. Place the bag in a warm location (70 to 90 degrees F). If more than half the seeds germinate within a week or two then you can be assured that the seeds are good. Buy seeds from a reliable seed dealer and get enough for at least two plantings. Getting your seeds early will insure your getting the varieties you want. Now you have laid out the soil in your garden site with delineated walking paths and planting beds that have a fine, smooth surface. The soil is loosened down deep so the plant roots will be able to extend easily in all directions to find nutrients, and water will percolate down well. The top surface of the soil is very fine and flat so tiny seeds won't fall down in between clods where they will be buried too deeply to germinate. Now it is time to put the seeds in the ground, or "sow" them. You can sow seeds in rows in the beds or broadcast them in a wide swath covering the whole bed. To sow seeds in rows, first read the packet backs of the individual varieties to get an idea of how far apart rows should be and how far apart seeds should be spaced in the rows. Make shallow furrows in the soil about 1/2 inch deep and a few inches apart using a stick or the handle of a rake or hoe. Then empty some seeds from the packet into the palm of your hand, and closing the palm gently, turn your hand over and let the seeds fall out slowly, using your thumb and forefinger to direct them into the furrow. This is a little quicker than picking up each seed and dropping it in one at a time. Never put all the seed in your hand at once in case of accidents or mistakes. Move slowly along the path and try to sow the seed as thinly as possible. Don't worry if it seems like you're dropping too many, this is a learned skill and you'll get better with practice. Then pull in the soil from the sides of the furrow and crumble it in to cover the seeds. Generally you should cover relative to the thickness of the seed; tiny seeds should be covered very lightly, larger seeds more thickly. Packet backs tell you how deep to plant seed and also tell you which seeds should have the soil firmed over them because they need especially good soil contact. (Beets and chard are two examples of irregularly shaped seeds that need firm soil contact for good germination.) With great big seeds like peas, beans and corn, you use a different sowing method. It is easier to place them on the soil first to space them, then poke them into the soil, filling in the poke holes as you go by smoothing the soil in the bed with your hand to level it out. Some packet backs recommend sowing seeds in the entire wide bed instead of in single rows. This works very well for root vegetables such as beets and carrots, and salad crops and greens because you can take advantage of planting space if you don't have to leave walking paths between each row. Also as you harvest each plant, the leaves of the ones next to it will grow and fill in the space, shading the soil from drying by the sun. Note: Be sure to mark each row or bed with the name of the plant sown there and the date. Cover freshly sown seeds with fine soil or use prepared soil mix for a more water-retentive material. To cover seeds sown in a bed, sprinkle the soil lightly over them about 1/4 to 1 inch deep according to the thickness of the seed. Consult packet backs for specifics. Water gently and carefully with a fine spray at this stage to avoid washing the little seeds from their soil bed. Seeds need even and constant moisture to germinate and the topmost layer of the soil bed may dry out if there are no rains and the weather warms up in the day. Check the surface of the bed carefully every day to see if it is evenly moist until the seeds are all germinated and growing well; it really pays to give extra attention to this vulnerable germination period. In dry hot climates you will probably need to water twice a day. It is best to sprinkle after the sun is up in the morning and not too late in the evening to keep water from over-chilling seedlings at night. Use a hose attachment with a fine spray or a gentle sprinkler to irrigate seed beds. Tiny seeds that are sown close to the surface, like carrots, are especially susceptible to germination problems if the top inches of soil are not kept evenly moist. You'll always start by sowing many more seeds you actually plan to let mature. This is because not every seed germinates even in ideal conditions, and you want extra seedlings "for insurance" to cover inevitable and ordinary losses to inclement weather or pests like insects, deer, birds or rodents. Also, you'll be choosing only the best and healthiest plants to grow to harvest; this important process of selection is called "thinning out" and is a very important part of successful gardening. Many customers ask how to store leftover unused seeds. Most varieties will keep easily for the next growing season provided they are kept cool and dry. Never leave seed packets outside in the garden or in an unheated garden shed or garage, because high humidity and dampness will ruin them. A sealed mason jar or ziplock bag is an ideal storage container. Keep seeds in your coolest room, or better still, in a refrigerator and plan to use them the next season. 
Plants Seed boxes are used for growing early plants while you wait for good weather for planting outdoors. You can start plants such as tomato, pepper, and eggplant from seeds planted in small wooden boxes. Grow the plants for 7 to 8 weeks in the seed box and then set them in the open. You want to set only the healthy, strong plants. MulchesAre the weeds growing just as fast, or even faster, than your vegetables in the garden? Weeds can make the vegetable garden an unsightly place to visit and will reduce the quality and quantity of your harvest.Mulching is an option to routine cultivation and hand pulling of these volunteer plants. Mulching involves covering the soil around the vegetables so that light cannot reach the soil surface. When done correctly, this eliminates all but the most persistent weeds.
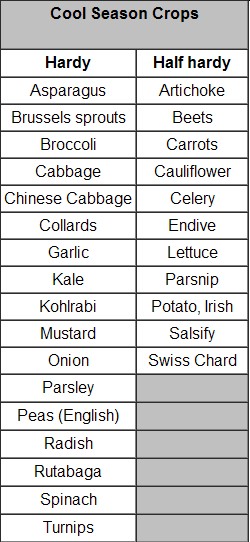
Many different materials can be used around vegetables. Black plastic is most effective around large and widely spaced plants, such as squashes, tomatoes, eggplant and peppers. And these crops really benefit from the weed control and extra warmth the black plastic provides. However, black plastic also provides an ideal environment for slugs. During wet growing seasons, these pests can present problems almost equal to that caused by weeds. Organic alternatives to plastic mulch include herbicide-free grass clippings, weed-free straw or the white pages of the newspaper. Organic mulches help moderate soil temperature, reduce evaporation from the soil, and can be incorporated into the soil or placed in the compost pile at the end of the season as a source of organic matter. Because of their soil improving capability, organic mulches are recommended. Grass clippings and straw can be placed around all established plants easily and quickly. Newspaper sections must be anchored to the soil with rocks or soil to hold it in place. For best results, remove all weeds from the garden prior to mulching. Thoroughly irrigate the garden prior to putting the mulch in place or time its placement after a soaking rain. If your choice is black plastic, cut slits in the sheeting to allow for air and water movement into the soil. Carefully anchor the plastic to the soil prior to planting the garden area. Grass clippings and straw will need to be spread at least 2 inches thick to be effective. And, these mulches will need to be replenished during the season as they decay. IrrigationThere is no set time to water the garden. Just be sure the leaves are dry when the sun goes down. If you row water, drip irrigate, or flood the garden, it can be watered at any time. If you sprinkle, be sure to turn off the water at least 2 hours before sundown. Apply at least 1 inch of water per week when it doesn't rain. InsectsWatch for insect infestation. If things are properly spaced in your garden, insects shouldn't be a big problem. If you do see evidence of chewing on plants, especially things like cabbage, don't wait to fight back. Identify the insect causing the damage and choose an insecticide or insecticidal soap that will control that specific insect. Proper spacing, weeding and fertilizing is a good way to prevent disease and insect infestation without having to resort to harmful insecticides.Crop RotationTo reduce the likelihood of plant diseases becoming a problem in your vegetable garden, do not grow the same crop in the same area of your garden each year. Rotate the crops by family and not by individual vegetable. Plant related crops (crops in the same family) in the same place only once every three or four years. For example, follow your tomatoes with peas or pole beans, followed by trellised cucumbers or squashes the second year, sunflowers the third year, and then back to tomatoes, peppers, eggplant, potato, or tomatillo. Harvesting VegetablesOne of the major benefits of growing your own vegetables is being able to harvest them when they're fully ripe and at their peak of freshness. In general, the best time to harvest is in the morning just after the foliage has dried. The plant has just had the night to recover from heat and water stresses common during summer days. Fruits and vegetables will be at their top quality then. Cooler temperatures in the morning also make the job less stressful for the gardener. Once harvested, don't let vegetables sit in the sun. Move them indoors as quickly as possible. Know Your VegetablesVegetables may be classified by their resistance to frosts and cold. By knowing this, you can tell what and when to plant for best production. The four general groups of vegetables are hardy, half hardy, tender, and very tender. Vegetables in the hardy group can withstand hard frosts and can be planted 2 to 3 weeks before the last killing frost in the spring or as soon as the soil can be prepared. The half-hardy group contains vegetables that can withstand light frosts. The seeds will germinate at low temperatures. These vegetables are planted about the time of the last killing frost. Seeds of cool season plants can sprout or "germinate" when the soil is still cool; you don't have to wait until the nights warm up and they can handle some spring frosts. It is time to prepare the garden for planting cool season crops in your area when the soil is "ready to work". This means in early spring when the earth is no longer frozen in northern climates, and in milder areas when heavy spring rains have subsided and soil is no longer muddy or sodden. Crops that are best started in the earliest spring weather are all the leafy greens and salads such as lettuce, spinach, chard and oriental greens, and the brassica family which includes broccoli, cabbage, cauliflower and kale. Radishes, peas and turnips can be planted in cool weather too. A few weeks later, plant root crops like carrots and beets. All these vegetables not only germinate and grow best when the soil is still cool, but they give the best tasting harvests if they can make their growth before the weather gets too hot. There are also some vegetables that can be planted in both cool and warm seasons, such as chard and beets; you can sow them in spring for summer harvests, then again in late summer. There are some warm season, heat loving plants like tomatoes, eggplants and peppers that will always need to be started from seeds in containers indoors instead of planting the seeds outside in the garden. This is because they require a very long growing season. 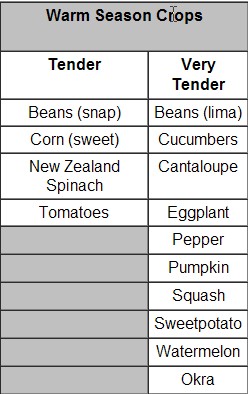
Vegetables And How To Grow Those Asparagus variety--Mary Washington. Plant crowns or roots in winter or early spring, setting roots 18 inches apart in 3 1/2- to 4-foot rows. Use plenty of well-composted organic matter. Open trench in rows 6 inches deep and 12 inches wide. Spread roots carefully, then fill in over each crown with 3 to 4 inches of loose, fertile soil. Cultivation must be shallow. Do not cut asparagus for table use the first spring, though you may expect a light cutting the second year. Cut for 4 to 5 weeks, then let stalks grow. After frost each fall, cut tops, remove them from garden, and burn. Cover beds with 3 to 4 inches of barnyard manure in late fall.
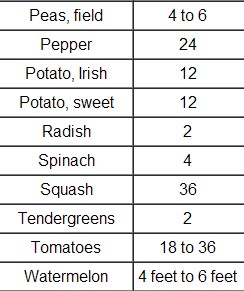
Beans, bush snap. This vegetable will produce in 55 days. Make plantings every 10 days to 2 weeks from March to May and one fall planting in August. Distance between rows should be 24 to 36 inches. Plant seed in continuous row with seeds 2 inches apart in row. Cover seeds 1 inch deep. Dust for bean beetles. Do not cultivate or pick beans when plants are wet. Beans, pole snap. Make at least three plantings from April to August. Space rows 3 to 4 feet apart. Drop seeds three per hill in hills 18 inches apart or plant in continuous drill with seeds 6 to 8 inches apart. Provide poles or wire and string for vines before they begin to climb. Beans, bush lima. Make a planting every 4 to 5 weeks from April to August. Plant as recommended for bush snap beans. Beans, pole lima. Make at least two plantings from April to mid-July. Plant, thin, and support as for pole snap bean. Beets. Plant any time from February to April for spring crop, in late August or September for fall crop. Rows should be 24 to 36 inches apart. You can use double rows 10 inches apart, with each double row 36 inches apart, if space is limited. You can also do this with carrots, lettuce, onions, radishes, English peas, and other early crops. In planting beets, open a shallow drill (trench), sow two or three seeds to each inch of row, and cover 1/2 inch deep. When plants are 3 inches tall, thin to a spacing of 4 inches. Plants removed can be reset if they are needed. Cabbage. Buy healthy plants for spring planting. Set in rows 24 to 36 inches apart, spacing plants 12 inches apart in row. May be planted from January to April. Feed cabbage plenty of nitrogen. Side dress with 1 pound ammonium nitrate to each 100 feet of row when plants are well established. Carrots. Plant spring crop from February through April; fall crop in August, September, and early October. Sow seed, placing four to six seeds to the inch. A few radish seeds mixed with carrots in seed row will mark row and help carrot seedlings through ground. Thin carrots to stand 2 inches apart. Chard, Swiss. Plant like beets, but thin plants to 12-inch spacing when 3 inches tall. Collards. Sow seed in spring or fall. Thin to 15-inch spacing. Fertilize with ammonium nitrate as for cabbage. Corn, sweet. Do not save seed. Make at least four plantings, beginning in March. Plant 2 to 3 weeks apart. Plant three seeds to a hill 12 inches apart and thin to one stalk per hill. Fertilize heavily. Do not pull suckers. Cucumbers. Plant seed in continuous drill with seeds 9 to 12 inches apart. Water if possible in dry weather. Pick regularly. Eggplant. Sow seed in seedbox or hotbed in January or February. Set in garden after danger of frost is past, spacing plants 18 to 24 inches apart. Lettuce, head. Plant in January or February in seedbox, if necessary. Transplant or thin plants to spacing of 12 inches. Lettuce needs rich soil. Lettuce, leaf. Sow in January, February, March, or April. Thin to 4-inch spacing. Make fall planting in August or September. Mustard. Sow every 3 or 4 weeks in February, March, and April and again in August and September. Thin plants to 1-inch spacing. Eat plants pulled in thinning. Okra. Plant after danger of frost is past, sowing seed thick enough to assure a stand. Leave plants 18 inches apart. One planting will bear until frost. Onion. Buy plants or sets or get sets of multipliers from your neighbors. Plant in garden in early spring, spacing onion plants or sets 3 inches apart. Thin those to store to 6 inches apart, eating green onions that are removed. Use rich soil for onions. Cultivate often and shallow. Pull to store when tops die down. Peas, English. Plant several varieties from January to April. Sow seed 1 inch apart in double rows 12 inches apart and place support of brush, wire, or string, between each double row. Pepper, hot. Plant seed in January or February in seedbox or hotbed. Set plants 2 feet apart in row after danger of frost is past. Six to 12 plants are enough. Peppers, sweet. Cultivate same as for hot pepper. May need to stake large plants. Stake like tomatoes. Potato, Irish. Plant spring crop in January, February, and March, and fall crop in August. Cut seed pieces with two eyes, the size of an egg or larger, and plant 6 inches deep 12 inches apart. Use potatoes from spring crop for fall crop, sprouting seed in July under moist sacks, straw, or soil. Plant 5 to 6 inches deep in August. Radish. Plant 10 to 15 feet of row every 2 weeks in February, March, and April, also in September and October. Sow seed 1/2 of an inch apart and 1/2 of an inch deep. Thin to 2 inches. Spinach. Plant any time in winter between October and March. Sow 1 inch deep and thin plants to 3 inches apart. Use ammonium nitrate as side dressing when plants are 2 inches tall. Squash. Sow two to three seed in hills 36 inches apart. Thin to one plant after the danger of frost is past. Tomato. Sow seed in seedbox or hotbed in February or March. Transplant to plant boxes or cold frame when 2 to 3 inches high. Set plants in open garden after danger of frost is past. Set plants in rows 3 to 4 feet apart with plants 18 to 36 inches apart in row. Prune early crop to one or two stems and tie to a 5-foot stake. Do not prune the fall crop as heavily. Sow seed in June for fall crop. Mulch tomatoes in June. Turnip and tender-green. Plant February to April and for fall garden in September. Sow seed 1/2-inch deep in rows or broadcast over wide bed. Watermelon. Plant seeds in April and May, six to eight seed in hill, 6 feet apart in rows 10 feet apart. Thin plants to two to hill. Distance Between Plants In Row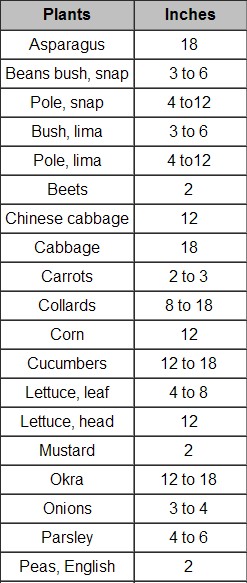

Fall Gardening Garden plots that were too wet for the spring garden may be just right for a fall garden. The fall garden should be located on soil that is loose, holds some moisture, and contains some organic matter or plant food.
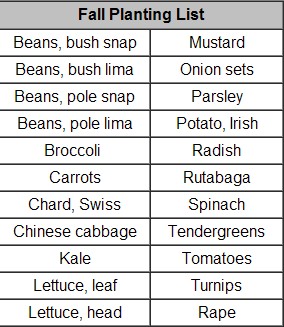
Tomatoes and beans will bear until frost as will okra, pepper, and eggplant (carry-overs from the summer garden). You can have fresh leafy vegetables from the garden until January. Planting the Fall GardenMoisture is most important in fall gardening. To get a quick stand of plants during a droughty period, practice these points:
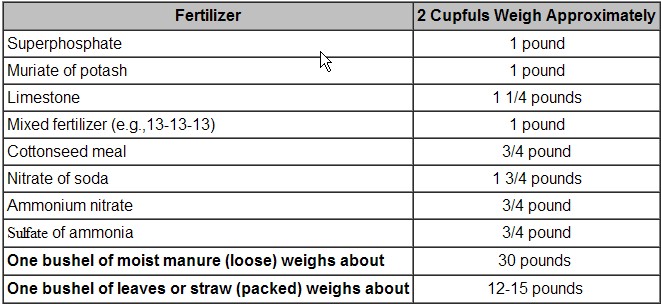
Example: If you want to weigh out 5 pounds of 13-13-13 fertilizer, by looking in the label you will find 1 pint (2 cupful's) weighs approximately 1 pound, so you would measure out 10 level cupful's. For 5 pounds of nitrate of soda, you would measure out 8 cupful's. The Average Life In Years For Vegetable Seeds
Note: Some seeds are known to survive much longer. 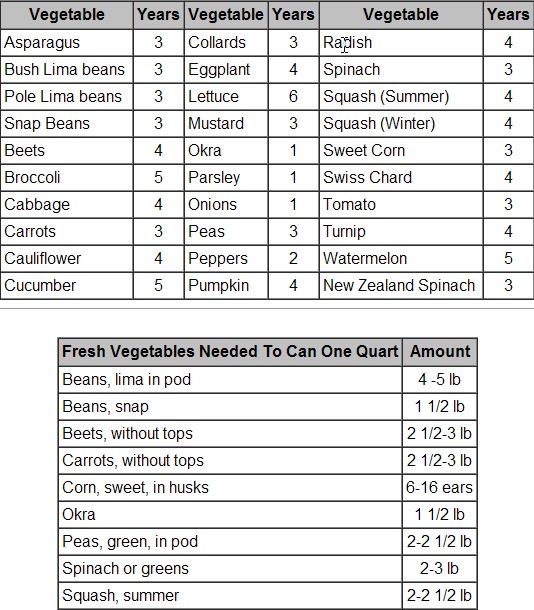
Example: It would take 1 1/2 to 2 pounds of green snap beans to can one quart.
1998 2023 Amedeo Ministries |
